AppBlock on Android

Looking for answers related to AppBlock’s functionalities? Explore frequently asked questions and discover helpful answers.

Tips & Tricks

Strict Mode acts like a digital “policeman”, ensuring that your Schedules and QuickBlock settings can’t be bypassed. To use Strict Mode, you must have either QuickBlock or Schedules set up.

Here’s how you can configure it:

Choose an access method that best suits your needs. You can select from the following options:

  • Timer Condition: This option locks your settings for a specified duration (e.g., one week). Once activated, you won’t be able to change your Schedules, QuickBlock, or deactivate Strict Mode until the timer expires.
  • Follow Schedules Condition: This option locks your settings whenever any of your Schedules are active. When no schedules are active, you’ll be able to make changes. However, note that even if Strict Mode is tied to just one Schedule, all other Schedules will also be locked from modification while Strict Mode is active.
  • PIN Code or Charger Unlocking: These are less strict options. You can unlock and make changes to your settings by entering a PIN code or connecting your device to a charger.

Access methods available from version 7.2.0:

  • Cooldown: This feature allows you to set a waiting period (2 to 10 minutes) on the Strict Mode screen before you can deactivate Strict Mode. It’s designed to make you think twice before deactivating Strict Mode, giving you time to reconsider your decision.
  • Approval: You can set up a partner’s email, such as a family member, friend, or trusted coworker, to unlock Strict Mode. If you need to deactivate Strict Mode, an email will be sent to them, and they can approve or deny your request to deactivate it.

Strict Mode provides a range of options to keep you on track, ensuring you stick to your goals without the temptation to easily turn off your blocks.

Additional Options:

You can also choose from additional options to define what will be blocked during Strict Mode:

  • Lock Blockings in App (always on): Ensures block settings cannot be changed.
  • Disable AppBlock Uninstalling: Prevents uninstalling AppBlock.
  • Block Device Settings: Restricts access to settings.
  • Block Recent Apps: Available for Pixel, Samsung, and Xiaomi devices to prevent bypass via recent apps such as pop up view/floating windows bypass.
  • Block Split Screen: Disables the split-screen feature.
  • Block Reinstalled Applications: Stops apps from being reinstalled to bypass blocks.

Important: Be careful and make sure you have the correct settings before turning on Strict Mode, especially if it’s your first time. This will help prevent unintentional blocking of an app or website for too long, as you may not be able to unblock it once Strict Mode is activated.

Was this article helpful?

If you find yourself downloading new applications to bypass your blocking, you can use the Add Newly Installed Appsfeature to ensure they’re automatically included in your block settings.

Steps to Block Newly Installed Apps:

  1. Create a Schedule or QuickBlock as you normally would.
  2. Scroll down to the Extra Options section.
  3. Turn on the option “Add newly installed apps.”
  4. Save the settings for your Schedule or QuickBlock.

Note: It may take a short time for AppBlock to detect and block newly installed applications, as it depends on when the system notifies AppBlock of the installation.

This ensures that any apps you install in the future will automatically be blocked according to your settings. If you have any questions or need assistance, feel free to reach out to support!

Was this article helpful?

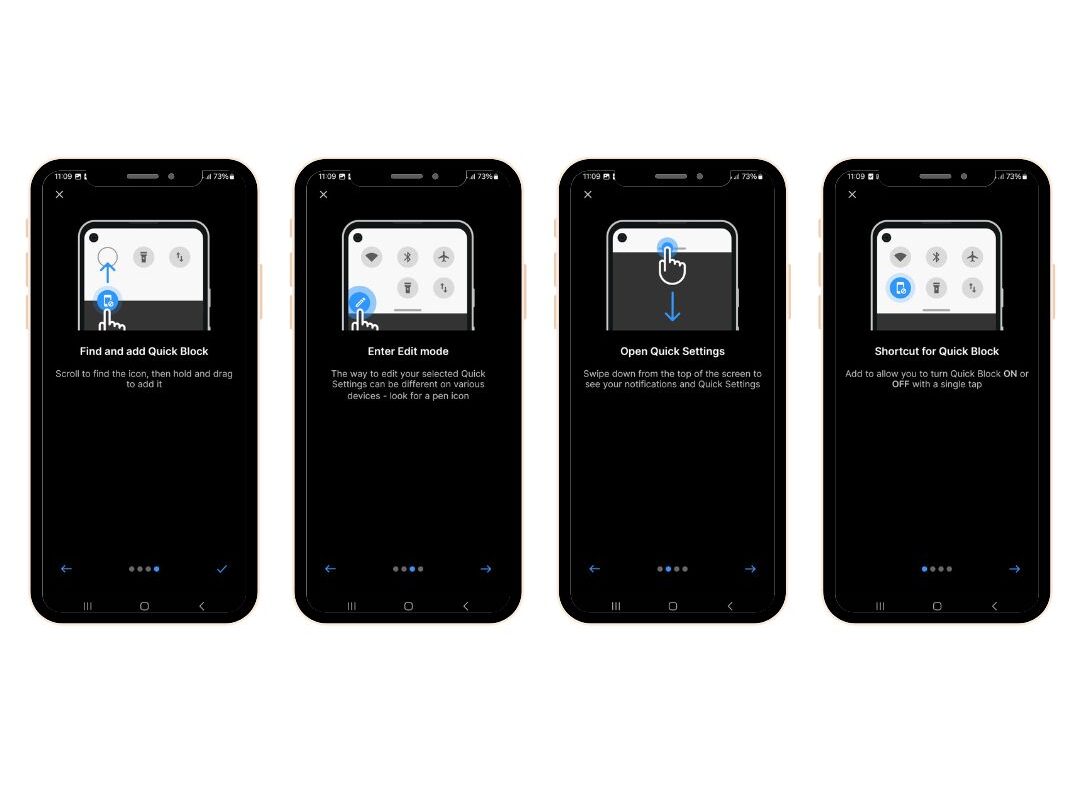
Shortcut will allow you to turn Quick Block ON or OFF with single tap

  1. Open Quick Settings – swipe down from the top of the screen to see your notifications and Quick Settings
  2. Enter Edit mode – the way to edit your selected Quick Settings can be different on various devices. Look for a pen icon
  3. Find and Add Quick Block – scroll to find the icon, then hold and drag to add it.
Was this article helpful?

AppBlock allows you to customize the notifications you receive to suit your preferences. You can manage these settings in AppBlock > More/Profile > Settings > Notifications.

Notifications are categorized into four sections: General, Schedules, Quick Block, and Statistics.

General:

  • Show blocked applications: Displays a notification with a list of all currently blocked applications.

Schedules:

  • Before start: Receive a notification a specified time before a schedule starts.
  • After end: Notifies you when a schedule stops being active.
  • Show blocked notification: Lists all apps whose notifications were blocked while the schedule was active.
  • Show remaining application usage: Displays the remaining usage limit for the current app or website in a notification.
  • Notification before usage limit reached: Sends a reminder notification before your usage limit is about to run out and blocking resumes.
  • Before pause ends: Receive a notification a specified time before a pause ends.

Quick Block:

  • After end: Notifies you when the Quick Block timer runs out.
  • Show blocked notification: Lists all apps whose notifications were blocked while Quick Block was active.

Statistics:

  • Show usage statistics: Displays usage statistics in a notification when the status notification is shown but no apps are currently blocked (e.g., when there’s an unused usage limit).
  • Weekly statistics report: Sends a weekly usage report comparing the current week to the previous week.

By customizing these options, you can stay informed about your blocking activities without unnecessary distractions.

Was this article helpful?

AppBlock offers various features that you can customize to make the app work best for your needs. Beyond setting up your Schedules and adjusting Strict Mode in the Blocking and Strict Mode tabs, there are additional settings available under More/Profile > Settings to enhance your experience.

Key Customizable Features

Theme

  • Prefer Dark Mode? Change the app theme to Dark Mode here for a more comfortable experience.

Language

  • Set your preferred language for the app interface.

Block Screen Message

  • Personalize the message displayed on your block screen by writing a custom text here.

Beginning of the Day

  • Need usage limits to reset at a time other than midnight? Set a different start time for your day.

Block Screen Timeout

  • Set a timeout period before you can close the block screen. This helps prevent multiple attempts to bypass the blocking.

PIN Code

  • Protect your AppBlock settings with a PIN code to prevent unauthorized or impulsive changes.

Enable Schedule Pause

  • Enable or disable the option to pause schedules based on your preference.

Quick Block on Blocking

  • Decide if certain settings should remain accessible while Strict Mode is active.

When Location is Unavailable

  • For location-based schedules, enable this feature to ensure schedules still activate even if location services are turned off.

Show Available Settings

  • If you want access to Bluetooth, Wi-Fi, and sound settings while Block Device Settings is active in Strict Mode, turn this feature on.

Blocking App Uninstall

  • Enable this feature to prevent AppBlock from being uninstalled, even when Strict Mode is disabled.

Check App Updates

  • Turn off this feature if you prefer not to receive notifications about new app updates.

Additional Options

You can also review and adjust:

  • Notifications Settings: Manage the types of notifications you receive for schedules, Quick Block, and usage statistics.
  • Statistics: Track your app and website usage for better awareness of your digital habits.

By customizing these settings, you can tailor AppBlock to better align with your blocking needs and personal preferences. Access these features via More/Profile > Settings and make the app uniquely yours!

Was this article helpful?

Yes, you can block only the notifications from specific apps without blocking the entire app.

Here’s how:

  1. Go to any Schedule in AppBlock.
  2. Tap the Settings icon in the top-right corner.
  3. Toggle “Launch” off and “Notifications” on.

This ensures that notifications from the selected apps are blocked while still allowing you to access and use the app.

Was this article helpful?

Want to limit how much time you spend on certain apps? Follow these steps to set up a Usage Limit Schedule:

Steps to create a Usage Limit Schedule:

  1. Go to the Blocking tab.
  2. In the Schedules section, tap + Add to create a new schedule or select a template.
  3. Choose between Blocklist or Allowlist (for premium users) and add the apps/websites/keywords you want to block or allow.
  4. Select Usage Limit as your blocking condition.
  5. Choose whether you want to apply a Daily or Hourly usage limit.
  6. Set the limit:
    • Use the +1h (hour) or +5m (minutes) buttons to adjust the limit.
    • Alternatively, type in the desired time directly.
  7. Save changes, review all your settings, including the apps and websites selected, and give your schedule a name.
  8. Tap Create to finalize.

Note: Schedules activate automatically upon creation. Unlike Quick Block, there’s no need to enable them manually.

This feature helps you manage your time by restricting how much you can use specific apps each day or hour!

Was this article helpful?

Want to block specific apps in certain locations or when you’re not at a particular location? Follow these steps to set up an Inverse Location Schedule:

Steps to create an inverse Location Schedule:

  • Go to the Blocking tab and tap + Add in the Schedules section to create a new schedule.
  • Choose the apps and websites you want to block. Name your schedule for easy identification.
  • Select Location as the blocking condition and ensure location permissions are granted. If this is your first time creating a Location Schedule, follow the on-screen instructions to enable the necessary permissions.
  • Tap the Inverse Location option to apply the block when you’re outside the specified location(s).
  • After setting the location and radius, tap Save and then Create to finalize your schedule.

Optional: If you want the location schedule to remain active when location services are unavailable, you may set this in the AppBlock settings, More > Settings > Toggle the switch “When Location unavailable on”.

In case you want to set the location where your apps are gonna be blocked, toggle off the switch for “Inverse radius” and Save your changes.

Was this article helpful?

Do you want to set different usage limits for weekdays and weekends, or combine multiple blocking conditions into a single schedule? You can easily do this by following these steps:

Steps to Combine Schedule Conditions:

  1. Go to the Blocking Tab
    • In the Schedules section, tap + Add to create a new schedule.
  2. Select Your First Blocking Condition
    • For example, choose Time.
    • Set it up as needed (e.g., specific days or hours) and tap Save.
  3. Add Another Condition
    • Next to your first condition, tap the little + Add button.
    • Select your second condition (e.g., Usage Limit), configure it, and save.
  4. Repeat for Additional Conditions
    • Continue adding and configuring conditions until you’ve included everything you need.
  5. Choose Apps and Websites to Block
    • Add the apps/websites/keywords you want the combined schedule to apply to.
  6. Save and Finalize Your Schedule
    • Review all settings and give your schedule a name.
    • Tap Create to complete the setup.


For example, to give yourself different usage limit for different days, you may create two schedules:

  1. Weekdays Schedule:
    Combine Usage Limit: 1h/day and Time: weekdays to limit apps to 1 hour per day on weekdays.
  2. Weekends Schedule:
    Combine Usage Limit: 4h/day and Time: weekends to restrict apps for up to 4 hours per day on weekends.


Combining Conditions in One Schedule:
The schedule will activate only when ALL conditions are met. For instance, a schedule with Time: Weekends and Usage Limit: 4h/day will only block apps if it’s the weekend AND the 4-hour limit has been reached.

Creating Multiple Schedules:
Multiple schedules work independently, creating an OR relationship. For example, if you want different blocking rules for specific apps or websites, place them in separate schedules. This ensures flexibility when applying different conditions to various apps.

If you have one app included in both a Blocklist schedule and an Allowlist schedule running at the same time, the app will be blocked because the Blocklist takes priority over the Allowlist.

Try combining conditions to tailor AppBlock to your needs!

Was this article helpful?

Want to block specific apps while you’re in certain locations? Follow these steps to set up a Location Schedule and limit app usage based on your current location:

Steps to create a Location Schedule:

  1. Go to the Blocking tab and tap + Add in the Schedules section to create a new schedule.
  2. Choose the apps and websites you want to block. Name your schedule for easy identification.
  3. Select Location as the blocking condition and ensure location permissions are granted. If this is your first time creating a Location Schedule, follow the on-screen instructions to enable the necessary permissions.
  4. Choose the Location and Radius – set the radius for the location where you want apps to be blocked. Alternatively, use the search icon in the top-right corner to type and select a specific address.
  5. After setting the location and radius, tap Save and then Create to finalize your schedule.

Optional: If you want the location schedule to remain active when location services are unavailable, you may set this in the AppBlock settings, More > Settings > Toggle the switch “When Location unavailable on”.

In case you want to set the location where your apps are gonna be unblocked, toggle the switch for “Inverse radius and Save your changes.

Note: Once you create a schedule, it activates automatically. Unlike Quick Block, there’s no need to enable it manually.

Was this article helpful?

Do you want to block certain apps or websites whenever you connect to a specific Wi-Fi network? Follow these steps to set up a Wi-Fi-based blocking schedule. Once configured, your selected apps and websites will be automatically blocked as soon as your device connects to the specified network.

Steps to Create a Wi-Fi-Based Blocking Schedule:

  1. Make sure your location services are turned on.
  2. Open the app and navigate to the Blocking tab.
  3. In the Schedules section, tap + Add to create a new schedule. Alternatively, select a pre-made template if available.
  4. Select the apps, websites, or keywords you want to block and give your schedule a descriptive name.
  5. Choose Wi-Fi as your blocking condition and select the Wi-Fi networks where you want the block to be active. You can manually add networks or choose from the list of available ones.
  6. Review all your selections save it and tap Create to save the schedule.

You can also combine the Wifi Blocking with other blocking conditions.
Note: Schedules are activated automatically after creating them. You do not have to enable them manually after setting them up.

Was this article helpful?

Want to limit how many times you can open certain apps? Follow these steps to set up a Launch Count Schedule:

Steps to Create a Launch Count Schedule:

  1. Go to the Blocking tab.
  2. In the Schedules section, tap + Add to create a new schedule or select a template.
  3. Choose between Blocklist or Allowlist (for premium users) and add the apps/websites/keywords you want to block or allow.
  4. Select Launch Count as your blocking condition.
  5. Choose how you want AppBlock to track app launches:
    • Daily: Set a daily limit for app launches.
    • Hourly: Set an hourly limit for app launches.
  6. Save your changes, review all your settings, including the apps and websites selected, and give your schedule a name.
  7. Tap Create to finalize the schedule.

Note: Launch Count schedules activate automatically after creation. There’s no need to enable them manually.

Was this article helpful?

There are two main ways to block websites: blocking specific URLs or blocking keywords for mass restriction.

Blocking Specific URLs

This method allows you to block only the specified links, making it ideal for restricting access to particular websites like facebook.com, twitter.com, reddit.com, or youtube.com.

Steps to block specific URLs:

  1. Create a Schedule or QuickBlock as you normally would.
  2. In the step where you select applications, tap on Webs at the top.
  3. Enter the URL of the website you want to block or select one from the suggested list. Only the part before the slash (/) is recognized.
  4. Repeat this process to block additional URLs.
  5. Save your settings.

Note: You can block both websites and apps within the same schedule. Simply configure apps first, then switch to the Webs tab, set it up, and save.


Blocking Websites Using Keywords

If you want to block many similar websites or include search results, blocking by keywords is the way to go. Keywords are checked in the domain of the URL (before the slash by default). If you’d like the keyword to apply to the entire URL, change the setting from “In domain” to “Anywhere in URL.”

Steps to block websites using keywords:

  1. Create a Schedule or QuickBlock as usual.
  2. In the step where you select applications, tap on Keywords at the top.
  3. (Optional) For more details about how keywords work, tap the info bubble on the top right.
  4. Type in the keyword you want to block. You can also select from a suggested list. To block the keyword across the entire URL, select the Anywhere in URL option.
  5. Repeat the process to add more keywords.
  6. Save your settings.

Editing Keywords

Predefined websites in the initial list cannot be edited; they can only be selected or unselected.To edit a keyword, hold the item and select Edit keyword.

Adult content

Was this article helpful?

Does your block seemingly randomly stop? Ignoring battery optimizations will likely resolve the issue.

  • Open the AppBlock Settings: More > Settings
  • Select Troubleshooting.
  • Select Ignore battery optimizationsThis will open your device’s battery optimization settings.
  • Tap on the dropdown menu that says Not optimized and select All apps.
  • Scroll down until you find AppBlock. Tap on it.
  • Select Don’t optimize and tap Done.
  • You may now return to the home screen.

Note: In AppBlock versions 5.X, Settings are found in the menu on the left > Settings. 

Was this article helpful?
We use cookies!
We use cookies for the best website functionality, which we process according to our privacy policy. More information about cookies can be found here.